


Take your astrophotography to the next level of quality and accuracy with flat frames — the easy way.
Shooting flats seems difficult, but once you figure it out it’s easy and very reproducible, assuming you’re pedantic about the details. Many people swear by sky flats, but if you’re objective is small enough, or your screen/light panel is large enough, these are easier and more controlled!
When I started astrophotography I was like most people, and only shot light frames, I didn’t want to take the time to shoot darks, bias, and flats. Now I won’t process astronomical data without them. I consider it a wasted imaging session if I’m not able to shoot darks and flats to match (bias are easy and can be shot anytime — more about bias frames in another post). That’s also why, in the interest of time saving, I consider a master dark library one of the most important things you can keep around (but that’s also for a another blog post).
While it’s best to shoot flats immediately after you finish your imaging session, you can buy yourself a little time if you are able to remove the scope from the mount without detaching the camera or moving focus. I’ve also made successful flats this way in the field.
Note: This method works for telescopes and camera lenses, DSLR cameras, CCDs, and one-shot color as well as monochrome.
Why you need to use flat frames
You need to make flat frames for DSO imaging! Here are some reasons that may help you understand why flat frames can add so much quality to your final images, not to mention without them you may not be getting a fully accurate representation of your target.
Flat frames fix vignetting
Vignetting “repair” is, in my opinion, the best reason to use flat frames. Tanja was imaging NGC 6723 using a full-frame sensor DSLR on our 8″ astrograph imaging newtonian telescope, and because of the large sensor size, on just about any scope, the vignetting was INSANE. Check out these before/after shots:

Flat frames fix brightness imperfections
No objective is perfect, it seems. There is always something that gets in the way and causes imperfections and changes in image brightness levels over the imaging plane. Because flats are made with as pure a light source as we can get, it is assumed that anything that shows as a dark patch in the acquired image is an imperfection in the imaging train. It could be a speck of dust, a scratch in a lens or mirror, a bug, a UFO, etc.
It’s simple: if you want to take your final image quality to a higher level, you MUST use all types of calibration frames, and flats are up there as some of the most important. Just do it!
What you need
- A clean white t-shirt or white cloth with little to no visible weave pattern. It must be big enough to fit over the objective end of the scope when stretched.
- A large rubber band or elastic.
- A good laptop LCD screen with a full-screen white image, or a uniformly lit and diffused white light panel that is a little larger than the objective end of the scope or lens. I use a 15″ MacBook Pro Retina, but you don’t need that. Any LCD or white-light panel will work as long as it is uniformly lit.
 Important things to remember!

- If at all possible, do not remove the camera from the telescope. If you must, mark it with tape. It needs to be in the same orientation as the light images.
- Do not move the focus position. Lock it down when you are finished shooting light frames (or even better, before).
- It is very important that everything in the imaging train is exactly as it was when you shot your light frames. Filters, dew shields, correctors, dust, etc. should be in place and not touched or cleaned.
- Don’t be lazy about the details.
How to do it
Camera settings
For DSLR
– Set your camera to MANUAL mode, just like you would with light frames.
– Set the ISO to 400 or lower.
– Start with an exposure duration of 0.5-2.5 seconds.
For CCD
– You will need to experiment with exposure duration, I needed an exposure length of 13 seconds with a 5nm Ha filter.
– Make sure to shoot separate sets of flats with each filter you use, the imperfections could be different!
For camera lenses
– Make sure the aperture and focus of the lens is exactly as it was when you shot your light frames.
Procedure
- With the lens cap/telescope cover off, stretch about 2 layers of the cloth/shirt tightly over the primary objective and secure it with the elastic. Ensure there are no folds or creases over the open end.
- For an LCD: create a pure white image to display full screen. I use a new document with a white background in Photoshop and make it full screen. Set the backlight brightness to about half to start with.
- Hold the LCD screen or white light panel up to the objective. If you cannot hold it directly against the objective with no gaps (shown below), drape a dark, light-blocking cloth over over the scope and screen, and/or shoot in a dark room so the only light that enters the scope objective is from the light source screen.

** Important! ** Make sure the objective is COMPLETELY covered by the light source panel. Light leaks from other sources can and will ruin the flats.
- Pick an exposure length in the middle of the suggested range, depending on your camera type (From above: 0.5-2.5 seconds for DSLR, CCD is dependent on the filter) and take a test exposure.
- Now you have to analyze the exposure to make sure the median brightness is correct (~51% or so). If you’re within around +/- 5%, you’re fine [in my opinion, right now]. If you’re shooting DSLR tethered or CCD it’s easy because you won’t need to remove the camera’s media card to access each test exposure.
Read more below about how I measure median brightness for my test exposures.
- If the exposure median brightness is not within +/- 5% or so of around 51%, adjust the light source brightness first to try and get it right. Once you’ve exhausted options for brightness, only then should you adjust the exposure length. Repeat and experiment with the light source brightness and exposure length until you get a median brightness as close as you can to ~51%.
- When you’ve found the sweet spot for your optical train and camera, shoot a lot of them. I usually take at least 30 exposures.
- Done! Now you can calibrate your light frames with these flats (and darks and bias, right!?) to get the most detail and quality out of your astro images.
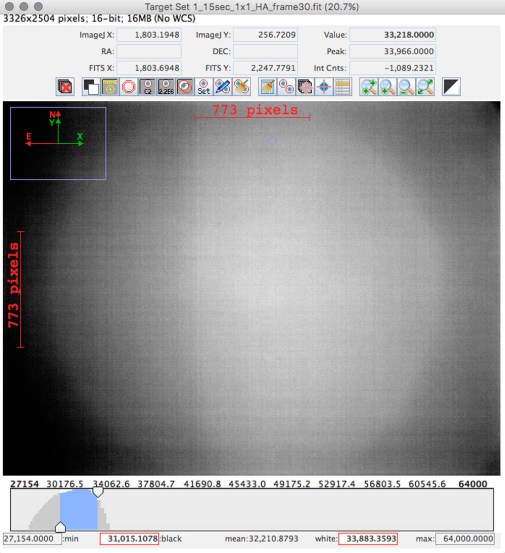
Measuring Median Brightness

** Important ** Avoid letting the way the flat frame looks influence your opinion. Go by the numbers!
For DSLR, I use the Image Statistics function in PixInsight (shown left).
For CCD, I currently use the per-exposure image statistics information available in Sequence Generator Pro.
Whatever image processing or acquisition software package you use, look at the median and maximum statistics numbers for the test exposure. You’re looking to get the median just a touch over half the maximum, around 51%. That being said, I’ve had good luck with a margin of error at +/-5% as well.
You want the maximum to be at or near “full-well capacity”, which is as bright as the pixels can get. So, increase brightness until it stops growing, and back up a bit until it’s just below maximum so you don’t overexpose your frames.
Other apps for measuring median brightness
Most, if not all, of the major image acquisition or processing applications should be able to give you image/pixel statistics.
If you want to measure this for free, one way would be to download the free trial version of Nebulosity. The mean and maximum for the currently viewed image is listed under “pixel stats” (left). Mean is not the same as median, but close enough, usually.
Another free application that shows proper image measurements and supports FITS files is called AstroImageJ, and can be downloaded here.
great guide thank you
Thanks! Happy it was helpful for you!
Great guide indeed. I never checked the median and got all sorts of noise in pixinsight.
Couple of questions though:
ISO speed does need to be 400 or less? I thought it should be same as lights.
Also, what other material would work to diffuse the light source ( LCD in my case ) ?
I’m having trouble finding a Tee/cloth with no visible weave patterns. I tried a stretched white plastic trash bag too 😛
PS. I’m using a canon dslr and 6′ newt
Hello!
* ISO doesn’t matter for flats vs. light frames, and you don’t want noise.
* Just a normal clean white t-shirt should work, the weave won’t likely show up. By visible, I mean you just shouldn’t be able to see it without really looking hard.
Otherwise, with your scope and camera, it should work great! Best of luck — and let me know how it goes!
Hi Cory. That is not exactly true. While it’s true a lower ISO flat will have less noise than a higher ISO (we won’t get into signal to noise ratios and shot noise etc here) using flat darks would produce a higher quality flat at the same ISO as the light image than using a lower ISO.
A flat frame also normalizes the quantum efficiency of the pixels across an image. For that reason the ISO of your flat frame and flat dark frames need to be the same as your light frame. This may not be critical for purely visual imaging purposes but if the images are to be used for scientific purposes then keeping the ISOs the same is very important.
Hi Paul,
That’s the first I’d heard of that for scientific images — and good to know!
I used to use flat-darks and calibrate my flats but since moving to PixInsight it was too much trouble for no perceivable improvement due to the superior algorithms! But, you’re right — that’s just in relation to purely visual images.
I’ll make a note in the article that keeping the ISO the same as the light frames is very important for scientific imaging — do you have any sources I can cite to go along with the comment in the article above?
Cheers!
Cory
+1 on same ISO as lights. Firstly we pick our iso for lights based on a balance between gaining lowest read noise and loosing dynamic range as gain is increased to point of a linear slope (http://www.sensorgen.info/). Secondly flats also need their bias/offset/read noise removed or your likely to inject noise back into your stack. Being bias frames are used to calibrate the flats their iso already match the lights and darks. We only need to do flat darks if the flat exposure length is more than a few seconds. That’s usually in cases of ccd and narrow band imaging. Some wonder why shoot bias frames if not shooting flats. Bias must be removed from darks in order to scale them.
KTMan, agreed! Great information!
Cheers,
Cory
Hi Cory, This tutorial is just what I was looking for (with tangible measurements to aim for). Thank you.
I tried the tee-shirt against laptop/notepad screen and the flats I get have distinct vignetting.
I didn’t think that is normal. Should be getting a uniform image.
The lights were 135mm f/5.6 13s 1600. I am using same settings to take the flats.
Look forward to your response.
Hello Suresh!
So happy to hear it was helpful to you!
Actually, the flat frames SHOULD show vignetting, especially when histogram stretched, and even before. The whole point is to CORRECT the vignetting in your imaging train, so the flats need to show it so the software knows exactly what to fix in the final image.
As I say in the article, I’d highly recommend using a much lower ISO, and much short exposures. 1-2sec, ISO400, maybe. The ISO and the exposure length do not (and should not in almost every case) match your light frames.
Cheers!
Cory
Thank you Cory for clearing that up!
Only settings to match with Lights then are focus and focal length.
Looking forward to the next clear night and trying this out.
Remember — the aperture matters as well, if you are shooting with a standard camera lens.
You must exactly match the focus, focal length, aperture, and also the angle of the camera on the scope/lens.
Everything that was in your imaging train should be there when you shoot flats — for example, if you use filters, you must shoot flats for the exposures you shoot with whatever particular filter you used.
Cheers!
Cory
Hi Cory, …. same angle of the camera on the scope/lens ??
Trick wording?
I have noted this mentioned often with respect to shooting flats but then I often see pics of the kit (camera/scope) lined up nicely with a laptop screen comfortably on a flat surface/table!
A little confused 🙂
What I mean by “angle of the camera” is that you can rotate the camera in the telescope focuser tube, so it needs to be the same angle as you shot with.
Hopefully I am making sense? 🙂
Cheers!
Cory
@Cory
Ha ! I knew it was trick wording ! 🙂
I took it to mean keep pointing at same elevation (scope and all) of the target object as when the lights were taken.
You are referring to the way the camera is attached to the scope irrespective of the scope’s orientation.
I see it now as following:
a) Shoot the lights and darks,
b) Can take the scope off the mount (camera still attached)
c) Take the flats conveniently laying the scope on table lined up with laptop
d) if kit needs to be packed up (per Tudor), can detach camera off the T adapter, and next day reattach camera and take the flats using the laptop as light source. Reattaching camera to the T adapter will maintain required alignment “with the scope”
For flats with DSLR,
e) as long as the focus ring is not disturbed and the other settings are maintained (except maybe ISO and shutter speed), I could do the flats any day after the lights were same as above.
Is my recap correct? 🙂
@Tudor,
Hi, much appreciate your advice. Thanks. Taken note for when I get the full kit …..on its way. Currently learning the basics with a 600D 🙂
@Suresh
In my experience, I leave my T adapter connected to the focuser (camera comes off so I can pack the scope). That way when I take the flats (usually during the next day after shooting) I get my camera in the same position and orientation.
(Focuser stays where I left it when taking the lights).
Tudor,
Good advice — I’ve done the exact same thing. And also, sometimes, I leave the camera attached, if possible.
Cheers!
Cory
@Suresh — Yep, I think you’ve got it covered!
Cheers!
Cory
This is Brilliant, especially the part about using the white LCD computer screen as a uniform light source. I am using a Sigma 50-500 piggyback and the vignetting is terrible, even with the “flats” I took…clearly didn’t take ’em right.
best and thanks,
RIck
Hi Rick,
Just try and try again! Once you get it, let me know what you may have done wrong!
Cheers,
Cory
Corey,excellent piece to show how it is done, Can you explain how you do it with just a Camera and Lens? As it is virtually impossible or very difficult I found when trying to cover the lens with T shirt without moving the focus ring !
Do you also have to have the lens virtually touching the screen.
Hi Brian,
I have done it with camera lenses many times successfully:
* Try laying/stretching the t-shirt over the laptop screen.
* Yes, the camera must nearly touch the screen, OR make sure you are in a light-controlled (dark) environment so there are no light leaks. That’s the important part.
Best of luck!
Cheers,
Cory
Corey, Thanks for the very quick reply, why did i not think out of the box ? Of course by putting the Cloth over the screen it overcomes the lens movement problem and doing it the dark room will also help.Many thanks for this you have saved me hours of turmoil.
Hi Brian,
Great! Good luck!
Cheers,
Cory
Cory, thanks for the informative article. If a lens hood or dew shield is used while taking the lights, should it also be used when generating the flats?
Hi Keith,
You’re welcome, and definitely! Your imaging setup for flats needs to be the same as for your light frames — if you used a dew shield, use it for the flats!
Cheers,
Cory
Hi! I’m a new astrophotographer at the age of 15. I was wondering, does the f stop matter? I tried to shoot my flat frames in the bathroom, with a Canon REBEL T3i, and there doesn’t seem to be any vignetting. I used the end with the lens cap and held a shirt over that, and all that came out was a white screen. I suppose I should try holding the white cloth and computer to the side with the viewfinder with the lens cap off? i didn’t try that.
Much appreciated for your thoughts and tips:)
Cheers,
Alex (@d.ffor on Instagram)
Hi Alex,
F-stop definitely matters, assuming you’re using a normal lens and not a telescope. The lens cap must be off, yes. You need to have everything physically the same as if you were shooting the light frames.
Cheers, and good luck!
Cory
Thanks Cory! So F-stop should be what? 4.5 or the same as what I shot the photo with?
Also, do flat frames work with star trails too?
Many thanks!
– Alex
Hi Alex,
Yes, the aperture should be exactly the same as what you shot the original photos with. Also, the exact same zoom level, if you used a zoom lens.
Flat frames could be used with star trails, but I’ve never seen the need to do so.
Cheers,
Cory
Thank you very much for this great article Cory! Very informative! One question, is Pixinsight the only option for measuring the median brightness for DSLRs?
Hi VonThiers,
PI is definitely not the only one! See near the end of the article “Other apps for measuring median brightness”.
Cheers,
Cory
Great stuff, Cory. Another tip….. make sure the automatic sensor cleaning is turn OFF on your DSLR. You don’t want the dust bunnies removed before you take your flats….
Cheers
Lynn Hilborn
http://www.nightoverontario.com
Hi Lynn,
Great tip!
Cheers,
Cory
Hi!
First of all : thanks for your very nice web site, it is very usefull and very well done!
You’re a pro!
Question : I use Photoshop CS5 and do you know where I can get info about the pixels stats use to make good flat frame ?? With the histogram window open in Photoshop, I can get the median value but I don’t know where to find the maximum value?? Thanks !
Hi Denis,
Your best bet is to use one of the applications I mention above, as they look at the true raw data. I’m also not sure where the maximum can be found in Photoshop!
Cheers,
Cory
Thank you for this article.
It is very useful.
How does the mean of 33174 from Nebulosity (example above) translates to 51% brightness?
What would the value in Nebulosity corresponding to 51%
thanks!!
A good night sleep made me figure it out 😉
Duuuhhhhhhh…. No point of taking time to answer my dumb question lol
Hi Steven,
Ha! Glad you figured it out — however, maybe I’ll update the article to be more obvious for the tired and sleep-deprived astrophotographers out there!
Cheers,
Cory
Great How To Cory. I try to shoot my flats at the same temp as my lights. If it’s 30 F outside, I shoot my flats at 30. 10, 0 or whatever it is, is the temp I shoot my flats. Not sure it’s is worth noting, but I do see a difference.
Mike
Hi Cory
I must say this article is one of the best recommendations I’ve read on flats, both by its accuracy and simplicity. Really good indeed!
I shoot with a modified Canon T1i on a C925 EdgeHD plus hyperstar. I’ve reached very good results from that setup as you can see in my gallery here: https://www.flickr.com/photos/alfredo_beltran/
The thing is that after reading this article I decided to check some of my flats on Pixinsight. What I’ve found raises a question: a lot of my flats have similar intensities on both green and blue channels, but the red channel is underexposed, to the point where it is easily half of the other two. Then the red channel must be undercorrected after using flats correction.
So, this leads to conclude that the light source is lacking red light and a solution would be to make the screen look reddish (by trial and error I guess) so I can have similar intensities on all three channels.
I’d appreciate your thoughts on this.
Thanks,
Alfredo
Hi Alfredo,
I would think that most of the channels would need to be semi-even as well, however I never really questioned that, oddly. I should take a look at my flats as well! It may be a good idea check the red channel alone in a flat-adjusted and non-flat adjusted stack to see the difference! I haven’t personally noticed any ill-effects, but in the interest of accuracy it would likely be a good idea. It’s also possible that the reds don’t transmit as strongly at the edges of the frame, I suppose it always depends on your optics…
Cheers,
Cory
Thanks for the guide Cory,
Why do I sometimes get very bright flats and some other times flats that are dark? All of them with a mean/max of about 51% in nebulosity? The back of the camera histogram is sometimes almost to the top limit (for the bright flats) or down below one third for the dark flats?
Is it best if I try to get them brighter or darker?
Hi Steven,
One of the main ideas behind flats is to have them be just above 50% or so of something called “full well capacity” for the sensor. Think of it as a bucket of light that is just over half full, in a way.
So, that being said, the “bright” flats you are talking about is likely what you want. It’s hard to say what you are getting exactly, but one thing to make sure of is that the mean/max measurement is over the entire image and not just a portion of it!
Cheers,
Cory
A very nice guide.
One question:
Say we have a KAF-09000 CCD with the full-well capacity of ~110,000 e-. What should the median value be? Somewhat above 55,000? Is Nebulosity limited to 64,000?
Miloš
Didn’t see your last reply, but it seems I am right?
Hi there!
Yes, I believe you are right — just above 50% of full-well capacity would be a good target. However, I’m not sure what it is or if Nebulosity has a limit, that will take some Google searching. 🙂
Cheers!
Cory
Hi Cory!
Thank you for your excellent guide. I will put it in practice very early. 🙂
I have just a question for you…
In the case in which I acquire light frames with a certain level of gain with my CCD camera, for the flat, dark and bias frames have I to use the same level of gain?
Thank you again for your work!
See you!
Angelo
Hi Angelo,
Yes! It is best and in most cases required to use the same camera settings for your calibration frames.
All the best,
Cory
Hello,
I have just tried your method and the 51% for median brightness is not working out on my D500. At 800 ISO when my histogram is sitting right smack in the middle, my median is 1293 and my maximum is reading 16383 (measured in pixinsight). Am I missing something?
Hi Mohammed,
It’s hard to tell without more information, but if the median is showing 1293, then it’s likely just not bright enough. Try experimenting with making the exposures a bit longer (what are you using now?). If you’d like to send me a copy of the raw image file from your camera, I can take a look as well!
Cheers,
Cory
Hi Cory, advice/help would be greatly appreciated! I have to admit that flats have been a real struggle for me. How do I go about sending you a raw file?
Hi there,
Send me an email at cory@photographingspace.com with a link to download the raw, and that should be fine! (don’t attach it though…that would be a bit too big!)
Cheers,
Cory
Hi there Mohammed,
I did a quick analysis of your image using PixInsight, and after converting it to grayscale (but also in RGB), you can see that it is not bright enough. I also looked at your exposure length and it is not long enough. Recommended length is around 1-2 seconds, but at ISO3200 that will likely create too bright an image as well, unless you adjust the source brightness to be much dimmer.
The maximum can be higher, and the median is far too low to work properly at just under ~10% of the maximum brightness. Remember, in the article it says you need to be around ~51% with a margin of error at +/-5% to get the best flat.
I hope that helps! Please let me know if there is anything I can do to make the article more helpful!
Cheers,
Cory
Thanks Cory. I picked the wrong flat to send you but its similar results down to 100 ISO. I will try using a ND filter to try to lengthen the exposure up to 1-2 seconds and experiment with a different slower lens. Thanks a lot!
Great advice, especially on the importance of mean value lightness.
On the procedure however, I must be misunderstanding something.
IIf I am understanding correctly–your procedure only works if taking flats after lights.
“Do not move the focus position. Lock it down when you are finished shooting light frames (or even better, before)”.
have never heard of anyone getting their flat frames after lights; at least not at 2-4am.
When taking flats before taking lights, it is not possible to “hold” the focus position, especially when capturing more than one DSO during a session.. Depending on the DSO, the focus knob is going to be adjusted, making it highly unlikely that it will “hold” the focus that was in the flats.
Maybe I am misinterpreting the meaning of “focus position” because I use a CCD rather than a DSLR.
thanks!
Hi Mark, thanks for the comment! I’ve been known to shoot flats at 4am. However, when I’m at home, I can shoot the next day after some sleep with this technique. 😉
No, you’re not misunderstanding, but I’ll clarify. When shooting with the CCD (and filters, of course), or multiple DSOs, yes the focuser may have to slightly move if they aren’t perfectly parfocal. From what I’ve seen I always have to refocus even if they are parfocal!
But, the focus position is almost always close enough for all filters/DSOs, etc., to work for all the flats, I’ve never had it fail, yet. Locking it down is just helpful advice for when you tear down the scope and take in indoors after a session, so you know where it is. I’ve even been able to take photos of the exact focus and camera position, tear everything down, and then shoot flats after re-setting things up. However, I wouldn’t recommend that because the more things get jostled around, the more they can be wrong.
For example, a while ago when we shot the Tarantula nebula in the Karoo (with the CCD), we shot all the lights for L-R-G-B-Ha only at night, then used this procedure the next day, in the house, to shoot the flats. We left the focus position where it was when shooting lights (for whatever filter was last used), and shot the flats for all filters there.
Basically, the short answer is: you’re not misunderstanding, but it’s close enough. 😉
Hope that helps!
Cheers,
Cory
Thank you Cory! Very kind of you.
Hi
I only have a DSLR, no scope at all yet. Do I still need to take flat frames, and if so, how?
Thanks
Hannah
Hi Hannah,
If you’re shooting long exposures for deep-sky images, then yes! It definitely helps the image a lot to use flats. The process in the article is the same for lenses as well as telescopes. Remember, telescopes are just really big lenses!
Cheers and clear skies!
-Cory
Hello Cory.
Great article, but one (probably stupid) question. How do I save the flats to my desktop if I use SGP or APT to capture them? SGP seems to save the files within itself, and I would like to export them so that they would be available for use in Astro Pixel Processor.
Frank
Hi Frank,
SGP (and I think APT as well…) have options to save the images in a specific location on your computer, depending on the camera you use. I believe this is the way it works with all cameras. So, you’ll have to check that setting out in SGP and APT specifically! But, it IS there. Promise!
No question is a stupid question. 🙂
Cheers,
Cory
Your article was very useful. However, I have a compact camera and my only goal is to eliminate the vignette. When shooting flat, I reveal the vignette most clearly. Is it enough? Light, pixel, 51% a bit complicated for me.
Hi there,
Regardless of the camera type or lens/imaging train configuration, the concept is still the same. Your best flat frames can be obtained by using one of the image measurement tools mentioned in the article, even with a compact camera.
Once you do it the first time and get it right, it gets easy very quickly! I hope that helps!
Cheers,
Cory
A very very very good article about how to do FLATS. Just finished few minutes a go doing my better FLATS now with my EOS 6D and 200mm lens.
Thank You Cory for your time and involvement to prepare this article.
Hi Pekdar, I’m so glad it helped you!
Cheers and clear skies,
Cory
Very helpful guide, thanks! Could you please explain why is it important do do flats after each photo session? For darks I can understand that it is related to the noise and therefore to the sensor temperature (plus ISO setting and exposure time), but for flats I am not sure, if I am always using the same lens. Only thing I can image is the dust on sensor, but it will not change with every session.
Hi Kamil,
As long as you do not remove the camera from the lens (or telescope), you could re-use your flats without a big issue. You MIGHT run into problems if you get a new spec of dust somewhere, but if you keep everything nice and clean, you can mitigate that issue without many problems.
I HAVE re-used flats from time to time, with varying results. The best you can do is try! You can always shoot flats again if re-using them does not work. But, for perfect and best results, you should create flats each session.
As always, the best images are the ones you make! Just enjoy it!
Cheers and clear skies,
Cory
[…] out this explanation of flat frames and how they can help you improve your […]